vue的组件通信

数据通信的4种方式:绑定引用类型(Object地址)、emit自定义事件、全局eventHub、Vuex
父子组件通信
爷孙组件通信
兄弟组件通信

更新
最新文档中提出,可以使用$root来访问根实例的数据

数据通信的方式

  • 引用类型数据:v-bind引用data里的数据
  • 自定义事件:子组件emit一个自定义事件,父组件监听这个自定义事件
  • 全局事件:eventHub
  • 状态管理:Vuex

引用类型数据

当引用的类型是对象(Object)时,由于引用的是对象的内存地址,因此,当子组件修改数据时,父组件也会跟着修改(因为他们指向同一个地址)

1
2
3
4
<div id="app">
{{obj.age}}
<xxx :obj="obj"></xxx>
</div>

1
2
3
4
5
6
7
8
9
10
11
12
13
14
15
16
17
18
19
20
21
Vue.component('xxx',{
props:['obj'],
template:`<h1>{{obj2.age}}</h1>`,
data(){
return {
obj2:this.obj,
}
},
created(){
setTimeout(()=>{
this.obj2.age=1;
},5000)
}
});
new Vue({
el:'#app',
data:{
obj:{age:18}
}
})

父组件的obj和子组件的obj2指向同一个内存地址,因此,当子组件的obj2修改数据时,父组件的obj也会跟着修改

【点击查看例子】

为了避免子组件修改数据时对父组件的影响,需要对Object类型的数据进行深拷贝

1
2
3
4
5
data(){
return {
obj2:JSON.parse(JSON.stringify(this.obj))
}
},

【点击查看例子】

父子组件通信

父传子通过props

父组件使用 props 传递数据给子组件

1
2
3
<div id="app">
<message msg="hello world"></message>
</div>

1
2
3
4
5
6
7
8
Vue.component('message',{
props:['msg'],
template:`<div><p :title="msg">我是儿子,我的父亲说<b>{{msg}}</h1><b></div>`,
});
new Vue({
el:'#app',
});

Prop验证

props一般写成数组的形式props:['name','age','content'],如果要为props指定验证要求,则写成对象的形式

1
2
3
4
5
6
7
8
9
10
11
12
13
14
15
16
17
18
19
20
21
22
23
24
25
26
27
28
29
30
31
Vue.component('my-component', {
props: {
propA: Number,
propB: [String, Number],
// 必填的字符串
propC: {
type: String,
required: true
},
// 带有默认值的数字
propD: {
type: Number,
default: 100
},
// 带有默认值的对象
propE: {
type: Object,
// 对象或数组的默认值需要写成函数形式return出去
default() {
return { message: 'hello' }
}
},
// 自定义验证函数validator,参数value是父组件传过来的值
propF: {
validator(value) {
// /验证父组件传进来的值是否满足以下条件
return value > 10;
}
}
}
})

$parent访问父组件实例

$parent 属性可以让子组件访问父组件的实例。它可以直接触达父组件,以替代将数据以 props 的方式传入子组件。这种直接获取父组件数据的方式不推荐使用,因为这会使得你的应用更难调试和理解。

1
2
3
Vue.component('Hello',{
template:'<p>{{this.$parent.msg}}</p>'
})

【点击查看例子】

子传父

父组件是使用 props 传递数据给子组件,但如果子组件要把数据传递回去,就需要使用自定义事件!

我们可以使用 v-on 绑定自定义事件, 每个 Vue 实例都实现了事件接口(Events interface),即:

  • 使用 $on(eventName) 监听事件
  • 使用 $emit(eventName) 触发事件

子组件无法直接修改父组件的数据,必须通过$emit()通知父组件,让父组件修改父组件的数据

如果这个事件处理函数是一个方法:

1
2
3
4
<div id="app">
<child-say @say="doSomethig"></child-say>
<div v-if="seen">{{msg}}</div>
</div>

那么组件$emit 发出的第一个参数 将会作为该方法的第一个参数:

1
2
3
4
5
6
7
8
9
10
11
12
13
14
15
16
17
18
19
20
21
22
Vue.component('child-say',{
template:`<button @click="handleClick">儿子说</button>`,
methods:{
handleClick(){
this.$emit('say',{a:'hello',b:'world'});
},
},
});
new Vue({
el:'#app',
data:{
seen:false,
msg:''
},
methods:{
doSomethig(data){ //第一个参数就是子组件$emit 发出的第一个参数
this.seen = !this.seen;
this.msg=data.a+' '+data.b
},
},
});

另一个例子
【点击查看例子】

一个简单的TodoList
【点击查看例子】

$refs访问子组件实例

你可以通过 ref 特性为每个子组件赋予一个唯一的ID引用,然后就能直接访问每个子组件实例了。这种直接获取子组件数据的方式不推荐使用,因为这会使得你的应用更难调试和理解。

1
2
3
4
5
6
7
<div id="app">
<a-cp ref="a"></a-cp>
<b-cp ref="b"></b-cp>
<c-cp ref="c"></c-cp>
<button @click="getMsg">获取C组件里的msg</button>
{{msg}}
</div>

1
2
3
4
5
6
7
8
9
10
11
new Vue({
el:'#app',
data:{
msg:'暂未获取'
},
methods:{
getMsg(){
this.msg = this.$refs.c.msg;
}
}
})

JS Bin

在HTML中通过$event获取参数

https://cn.vuejs.org/v2/guide/components.html#%E4%BD%BF%E7%94%A8%E4%BA%8B%E4%BB%B6%E6%8A%9B%E5%87%BA%E4%B8%80%E4%B8%AA%E5%80%BC

如果这个事件处理函数不在methods里,而是在HTML中。那么通过$event获取$emit 发出的第一个参数

1
2
//组件中
$emit('say',{a:'hello',b:'world'});

在HTML中,父级通过 $event 访问到$emit发出的第一个参数

1
2
3
4
<div id="app">
{{msg}}
<child-say @say="msg=$event"></child-say>
</div>

【点击查看例子】

组件绑定原生事件

在 Vue 2.0 中,为自定义组件绑定原生事件必须使用 .native 修饰符:

1
<my-component @click.native="handleClick">Click Me</my-component>

.sync 修饰符

文档:sync修饰符
在有些情况下,我们可能需要对一个 prop 进行“双向绑定”,使子组件的prop修改时,父组件的data也跟着改变。为了方便起见,我们为这种模式提供一个缩写,即 .sync 修饰符,其实它是v-on:update的语法糖

1
2
3
4
Vue.component('child-say',{
props:['msg'],
template:`<button @click="$emit('update:msg','儿子的值')">儿子改变父亲的data</button>`,
});

1
2
3
4
<child-say
:msg="msg"
v-on:update:msg="msg = $event"
></child-say>

上面的代码用.sync语法糖改写如下:

1
<child-say :msg.sync="msg"></child-say>

【点击查看例子】

爷孙通信

  • 爷孙之间无法直接通信
  • 爷爷必须先通过props将数据传给父组件,然后靠父组件将数据传给孙组件
  • 孙组件必须先通过$emit通知父组件,然后靠父组件将数据传回给爷组件
1
2
3
4
5
<div id="grandfather">
我是爷爷
<button @click="seen=true">打开孙子</button>
<father :seen="seen" @close="seen=false"></father>
</div>
1
2
3
4
5
6
7
8
9
10
11
12
13
14
15
16
17
18
Vue.component('father',{
props:['seen'],
template:`<div>我是父亲
<child v-show="seen" @close="$emit('close')"></child>
</div>`,
});
Vue.component('child',{
template:`<div>我是孙子<button @click="$emit('close')">关闭</button></div>`,
});
new Vue({
el:'#grandfather',
data:{
seen:false,
},
});

兄弟组件通信(利用事件总线)

利用eventHub(也叫eventBus)实现兄弟组件通信
通过使用事件中心,允许组件自由交流,无论组件处于组件树的哪一层。由于 Vue 实例实现了一个事件分发接口,你可以通过实例化一个空的 Vue 实例来实现这个目的。

目前事件总线是解决兄弟间通信,祖父祖孙间通信的最佳方法
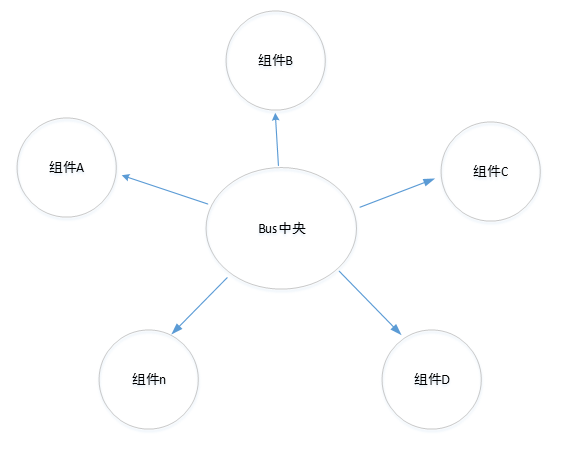
bus事件总线

  • 一个组件通过bus.$emit('自定义事件名',参数)来发布事件
  • 另一个组件在created阶段,监听bus.$on('自定义事件名',(参数) = >{ 执行代码 })
1
2
3
4
<div id="app">
<gege></gege>
<didi></didi>
</div>
1
2
3
4
5
6
7
8
9
10
11
12
13
14
15
16
17
18
19
20
21
22
23
24
25
26
27
28
29
30
31
32
33
var eventHub = new Vue();//事件管理中心
Vue.component('gege',{
template:`<div>哥哥说:<input @keyup="handleKeyup" type="text" v-model="gege_say">
</div>`,
data(){
return {
gege_say:'',
}
},
methods:{
handleKeyup(){
eventHub.$emit('gegeSay',this.gege_say);
},
},
});
Vue.component('didi',{
template:`<div>我是弟弟,我的哥哥他说:{{msg}}</div>`,
data(){
return {
msg:'',
}
},
created(){
eventHub.$on('gegeSay',data=>{
this.msg=data;
});
},
});
new Vue({
el:'#app',
});

改进

为了避免全局变量,将eventHub放到Vue的原型上
https://blog.csdn.net/a5534789/article/details/53415201
https://juejin.im/entry/59828fdd6fb9a03c5754b8ab
Object.defineProperty(Vue.prototype, ‘$axios’, { value: axios })

1
2
3
4
5
6
7
8
9
10
11
12
13
14
15
16
17
18
19
20
21
22
23
24
25
26
27
28
29
30
31
32
33
34
35
//将空的 Vue 实例放到vue的原型上作为事件中心
Vue.prototype.$eventHub = new Vue();
Vue.component('gege',{
template:`<div>哥哥说:<input @keyup="handleKeyup" type="text" v-model="gege_say">
</div>`,
data(){
return {
gege_say:'',
}
},
methods:{
handleKeyup(){
this.$eventHub.$emit('gegeSay',this.gege_say);
},
},
});
Vue.component('didi',{
template:`<div>我是弟弟,我的哥哥他说:{{msg}}</div>`,
data(){
return {
msg:'',
}
},
created(){
this.$eventHub.$on('gegeSay',data=>{
this.msg=data;
});
},
});
new Vue({
el:'#app',
});

另一个例子
【点击查看例子】

再看一个例子

1
2
3
4
<div id="app">
<cp-a></cp-a>
<cp-b></cp-b>
</div>
1
2
3
4
5
6
7
8
9
10
11
12
13
14
15
16
17
18
19
20
21
22
23
24
25
26
27
28
29
30
Vue.prototype.$bus = new Vue();
Vue.component('cp-a',{
template:`<div>组件A
<button @click="handleClick">将组件A的msg传给组件B</button>
<div>`,
data(){
return {
msg:'来自组件A的问候'
}
},
methods:{
handleClick(){
this.$bus.$emit('xxx',this.msg);
}
}
});
Vue.component('cp-b',{
template:`<div>组件B -- {{msg}}</div>`,
data(){
return {
msg:''
}
},
created(){
this.$bus.$on('xxx',msg=>{
this.msg = msg;
});
}
});

JS Bin

eventHub

1
2
3
//eventHub.js
import Vue from 'vue';
export default new Vue();
1
2
3
4
5
6
7
8
9
10
11
12
13
14
15
16
17
//子组件
<template>
<h1 @click="hello()">{{ xxx }}</h1>
</template>
<script>
import eventHub from "../eventHub.js";
export default {
props: ["xxx"],
methods: {
hello() {
eventHub.$emit('hello','yoooooo');
}
}
}
</script>
1
2
3
4
5
6
7
8
9
10
11
12
13
14
15
16
17
18
19
20
21
22
23
24
25
26
27
28
//父组件
<template>
<div id="app">
<HelloWorld :xxx="xxx"/>
</div>
</template>
<script>
import HelloWorld from "./components/HelloWorld";
import eventHub from "./eventHub.js";
export default {
components: {
HelloWorld
},
created() {
eventHub.$on("hello", str => {
this.xxx = str;
});
},
data() {
return {
xxx: "stage"
};
}
};
</script>

$root访问根组件实例

为什么要弄个 Bus?直接 this.$root.$on、this.$root.$emit 不更简单粗暴?
答:按照文档上的说法是专门用一个空的 Vue 实例(Bus)来做中央事件总线更加清晰也易于管理。
掘金:非父子组件通信方法

文档:$root
在每个 new Vue 实例的子组件中,其根实例可以通过 $root 属性进行访问。例如,在这个根实例中:

1
2
3
4
5
6
7
8
9
10
11
12
// Vue 根实例
new Vue({
data: {
foo: 1
},
computed: {
bar(){ /* ... */ }
},
methods: {
baz(){ /* ... */ }
}
})

所有的子组件都可以将这个实例作为一个全局 store 来访问或使用。

1
2
3
4
5
6
7
8
9
10
11
// 获取根组件的数据
this.$root.foo
// 写入根组件的数据
this.$root.foo = 2
// 访问根组件的计算属性
this.$root.bar
// 调用根组件的方法
this.$root.baz()

【点击查看例子】

简书:vuejs填坑-父子组件之间的访问

在组件上使用 v-model

https://cn.vuejs.org/v2/guide/components.html#%E5%9C%A8%E7%BB%84%E4%BB%B6%E4%B8%8A%E4%BD%BF%E7%94%A8-v-model

1
<my-input v-model="searchText"></my-input>

为了让它正常工作,这个组件内的 input 必须:

  • props: [‘value’]
  • $emit(‘input’, $event.target.value)
1
2
3
4
5
6
7
8
9
Vue.component('my-input', {
props: ['value'],
template: `
<input
:value="value"
@input="$emit('input', $event.target.value)"
>
`
})

JS Bin

在非表单控件的组件上也能用v-model

v-model本质上是个语法糖,它与value绑定,并监听input事件。因此,只要满足以下条件,就能在非表单控件上使用v-model

  • props:[‘value’]
  • this.$emit(‘input’,参数)
1
<hello v-model="count"></hello>
1
2
3
4
5
6
7
8
9
10
Vue.component('Hello',{
props:['value'],
template:'<button @click="handleClick">{{value}}</button>',
methods:{
handleClick(){
this.value++;
this.$emit('input',this.value);
}
}
})

【点击查看例子】

Vuex进行状态管理

对于大多数复杂情况,更推荐使用一个专用的状态管理层:Vuex。

小技巧

自定义事件名

https://cn.vuejs.org/v2/guide/components-custom-events.html#%E4%BA%8B%E4%BB%B6%E5%90%8D

自定义事件始终使用 kebab-case 的事件名【跟组件和 prop 不同,事件名不会自动进行大小写转换。】

1
2
3
this.$emit('my-event')
<my-component @my-event="doSomething"></my-component>

绑定多个事件

1
<div v-on="{clickSaveBtn, print, clickLogout}"></div>

组件绑定原生事件

在 Vue 2.0 中,为自定义组件绑定原生事件必须使用 .native 修饰符:

1
<my-component @click.native="handleClick">Click Me</my-component>

$emit()中的事件名称始终用kebab-case

1
2
this.$emit('myEvent') //报错
this.$emit('my-event')
1
<my-component @my-event="doSomething"></my-component>
-------------本文结束感谢您的阅读-------------